

MY STORY
If you’re a voice over artist or musician, and struggle to find a quiet space to work without interruptions, there are many different types of solutions out there. Budget-conscious efforts such as converting a walk-in closet to a studio, or in my case, enveloping my space in moving blankets, cheap acoustic panels, and PVC pipe, can be very effective. My enclosure cost right around $110 and did a great job of dampening my sound, eliminating unwanted reverb and echo.
As a beginner in the VO world, this allowed me to produce audio books and complete various types of other work that were professional quality. The problem? Like others who work from their home and live in neighborhoods, I dealt with the typical interruptions: lawnmowers, loud cars, barking dogs, etc. These sounds permeate walls (and moving blankets) and when you absolutely have to have a clean take, these interruptions make it impossible to work through. In addition, we live one mile from train tracks and 10 miles from John Glenn International Airport in Columbus, Ohio. Planes fly overhead all the time. All. The. Time. From little commuter planes to jumbo jets, sometimes they go directly over our house. The low rumble pierces through, and at certain times of day, can be as frequent as one plane every 90 seconds.
Which meant, essentially, I couldn’t record. I mean, I could, but trying to get into the flow of narration while having to stop that frequently was just too frustrating.
So I worked through it, but frustration mounted as I had already committed to making this part of my living, to compliment my music career. For much of 2017, I would try to do the bulk of my recording after midnight. Fewer planes, so theoretically a better flow. This kind of worked, but there are so many evenings where I’m out performing or running events that, by midnight, having been up the entire day, I’d find my voice was pretty much worn out.
So I felt like I needed something better, that would allow me to work 24/7.
In November, 2017, I began my search for an isolation booth. There were several options out there, each with their own set of pluses and minuses. I won’t compare all the different solutions I found, but when I found StudioBricks, something about it clicked. A unique design (it basically assembles like Legos), promise of superior sound isolation, and adaptability.
ORDERING
StudioBricks has default booths you can purchase, the One unit (3×3′) and the OnePlus (4×3′). My existing booth was 5×5′, with a large desk inside, but I had plenty of room. Clearly, to stand (or sit) and record, not much space is needed. However, as I thought about the possibilities, I realized that if I put this on the ground floor, I could actually treat it as a studio and have musicians come in and record tracks. To allow room for guitars and other instruments, I decided to go with a custom 5×4′ unit (with a 7′ ceiling). They also offer different levels of “thickness”, or number of walls in each piece. Single, double, or triple. I went with double walls, which offer sound insulation at 46 dB. Here are some other specs and features that came with my booth:
Ventilation kit with filter
LED Lights
Rug
Flexi A50 Vicoustic Panels
So, all exciting stuff. I placed my order via e-mail with Miguel on November 22, who would prove to be an invaluable resource throughout the entire process. Once we decided on all the above options, the total price ended up being $9940. Jesus. Holy $&*%. The basic units are closer to the $4-6000 range. Adding the extra footage brought the price up considerably, but I knew I needed it. And I knew I needed the booth. They needed half payment up front, and a wire transfer from my bank was easy enough to get that done. Incidentally, the shipping costs alone were $1950.
StudioBricks hails from Barcelona, and this is where they produce the booths. I knew it would take a while to get here, and Miguel said that, since we were heading into the holidays, it would likely be a couple weeks longer than usual. I placed the order on November 22 and was told it would take roughly 12 weeks to arrive.
I also need to note that StudioBricks also has a VO Edition, which costs an additional $1000 and includes a tiny desk, mic holder, monitor arm, and a few other things. I took a look at this but quickly decided it wasn’t going to serve me very well. The main reason is that, due to pretty severe lower back issues, I had purchased a VariDesk last year, which allows you to easily switch from a standing to sitting position. It’s been great, and at 40 pounds or so, requires some sturdy surface space. So I passed on the VO Edition and instead, my dad built me a really cool desk that fits perfectly inside the new booth.
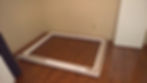
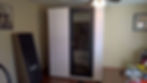
The room I intended to put the booth in wasn’t in any shape whatsoever to handle it. I’d been using it as kind of a staging area for my musical equipment, to drop off and pick up my PA and other stuff as I needed it. It was a complete, utter mess, but we didn’t care too much about it. My wife and I took this as an opportunity to finally rearrange the entire house, including extra bedrooms we had since the kids had left. I had plenty of time to get a lot of work done, and it paid off. Here’s before and after shots of the room:
I was ready. Sadly, it took even longer than expected to receive the order. It arrived on March 8, 106 days after ordering. I do want to note that most reviews I’d read of the ordering/receiving process dealt with customs, and lots of forms needing to be filled out. There was none of that with mine. StudioBricks recently opened a site in New York and I believe they are now able to accept the international shipment and handle all the paperwork. I don’t know much about that stuff, but essentially, it was as easy as ordering anything on Amazon.
BUILDING
Well……not exactly. This monstrosity arrived via R+L Carriers. There was only one guy in the truck and I watched as he somehow got the pallet off the truck and up to my driveway. I had to help push it up to the garage door. He kept wanting to push it all the way into the garage, but that would have been a pain to try to pry all the boards off the crate with little room.
This crate weighed 1790 pounds.
My dad arrived shortly after I started trying to open the crate and between the two of us, it took about 90 minutes to get all the pieces into the house.
I was hopeful that I’d be able to get the whole thing knocked out in one session. I’d seen various videos of the StudioBricks guys setting booths up in eight minutes. Impressive, and I knew I’d take much longer, but I still wasn’t prepared for reality.
And the reality was that, due to my custom unit, some of these pieces weighed 70-80 pounds. I’m estimating, but I’m sure that’s about right. The longer pieces in particular were heavy and unwieldy. Plus, the door. Oh my God, the door. StudioBricks and others who have built these booths stress that it’s heavy. It’s more than heavy. Well over 100 pounds, it took my dad and I about 10 minutes jut to get through the door of the garage. And I’d thought I could do this by myself? I’m fit, but, no. No chance. So that’s a caveat for anyone interested. Just make sure you have some help with whatever booth you get.
My dad left, so I started building the unit myself. This is the bottom frame, laid out, ready to connect:

It’s essential to get the frame level. If it’s not, the pieces won’t fit properly. That took a little bit, but I got it:
Then I got busy with the A level. There are four levels, A through D, and each piece is marked A1, A2, etc, with 1 being left of the door. Now, I have to pause to let you know that I’m less than intuitive when it comes to building, crafts, any kind of three-dimensional activities that require any kind of thought. I’m an artist, I can draw, but for whatever reason, when you add that extra dimension, I just fall apart.
So, it took me a little bit of time to comprehend exactly where to start, and how the pieces worked together. And this leads to my only real pain point with StudioBricks…..the instructions. Or, lack of. There are none at all in the shipment. They will send you links with videos and pictures of other booths being built. The problem is that these are random booths….they could be standard or custom size, but they have nothing to do with your booth. So, while the pictures helped in some ways, as far as understanding how parts fit, there was no help at all as far as orientation. Which I needed.
One part that kind of got me stuck was the L-wedges and sticks that go into the corners on every level. The wedges themselves are fine, but you need to apply a sticky square on top of the sticks, and that the wedges that sit on top look like they don’t fit. Miguel assured me that the weight of the other levels would squeeze them tight.
After getting that figured out, I did make progress, as shown here:

That’s the whole A level, complete. The floor isn’t in yet. The floor consists of two long boards, the edges resting on the frame. An immediate problem I found was that when I stepped close the middle on one side, the other side would raise up:

Two days later, when my dad came back to help, he fixed the problem by simply placing a long board right underneath the middle:

Perfect! Back to day one, I finished up the evening by getting some of the B level done:

At this point, I was done. Physically, I just couldn’t go on, and the next day I had two nursing homes to perform at in the afternoon, then a three-hour solo show that evening. I needed to try to not hurt myself so I could get through the day. I did play my shows, but as I mentioned, my back is pretty bad. My dad and I both have pretty wretched spines. I have degenerative disc disease in the 4th and 5th lumbar and just a week prior to this discovered that there’s essentially no way to avoid fusion surgery sometime in the future. I’m 43, in good shape, but in constant pain, so it’s been a struggle. Ironically, I had a cortisone shot schedule for Monday, just two days after we got done with the build.
My point, I guess, is that this was the exact kind of activity I needed to avoid, but there was no avoiding it. Your booth may contain very heavy pieces, so be sure to take care of yourself, avoid injury, have people help. Make it a build party!
Now on to Saturday, the day after my shows. I was in quite a bit of pain and waiting for my dad to arrive, kind of surveying everything when it hit me; I had to start completely over. I had wanted to position the booth as far into the corner as I could and by doing so, pushed the ventilation and outlet holes within a couple inches of the wall. There’d be no way to get those installed. Okay, then. I didn’t get horribly upset…..it was kinda par for the course in my world. The only good thing about it was that by this time, I did have a pretty good understand of how to build it.
Dad arrived and together, we moved the frame over a couple of feet. Of course, that meant we had to re-level it and for some reason it took longer than it did the first time. After that, it didn’t take too long, until we got to the door. That behemoth of a door:

It was a pain to get upright but really, once we got it into position, it pretty much snapped into place like all the other pieces. With a bit more force needed, sure, but, it worked. So, we continued. Here’s all the levels complete, without the roof:
At this point, we’d needed stepladders to get the D level done, and it took some work to get the roof pieces up. Here’s the whole thing:

We stopped for the day, all of the major construction done. We weren’t able to get back to it until a few days later, but all that was needed were the ventilation unit and cable pass-through. They went into these holes:

The ventilator is pretty nice, runs quietly and provides a bit of cool relief from what is a hot little space. It’s not completely silent though, as you’ll see in videos below. Also, the cable pass-through is pretty interesting, allowing you to feed cables into your booth, then completely seal the space.A very helpful video is available here.
So, with all that done, I moved everything in from my old office, anxious to start testing.
INITIAL RESULTS
Here are a couple shots of the inside as soon as I moved everything in:
First impressions? Well, as soon as I closed the door, the isolation was apparent. The door latches firmly shut, and when it does, it’s almost like you’re in a vacuum. There’s a different kind of space that exists here. I’d left the TV on in the other room at regular volume, and while it was audible with the door open, it was gone when the door was shut.
Now, its not sound proof. Nothing built for home use is. But the StudioBricks booth does a fantastic job of both eliminating as much outdoor noise as possible and creating a private, close space that allows you to record without interruption. Here’s a little test I did with some AC/DC blasting away:
Pretty darn good results. So, I was pretty happy with that, but had an issue that I noticed as soon as I spoke for the first time in the booth; a boomy, tunnely sound that I didn’t care for at all. The above images show that while most of the walls are covered with the acoustic panels, there is space at the top and bottom that is “untreated”. If I knocked on the wall, I could pretty much hear the echo. It made sense, and I hadn’t had any plan in place until I was all set up so I could make an informed decision on what else I would need. In this case, the need was for bass traps.
While I think this boomy issue would be present for anyone, it was likely a bit more present for me, with my low end hammering the exposed walls. So, to neutralize that, bass traps would sort of “capture” the low end, diffuse it without eliminating it. I ordered four of these, from Auralex, and they arrived within a couple days. I attached three of them to the top portion of the booth, using t-pins to connect them to the existing panels, like so:

The immediate difference in the sound was amazing. The issue was largely gone. At the same time I ordered the bass traps,I also got these sheets of Roxul rockboard mineral wool. Now, this is something I should have had handy. It was suggested to lay them under the floor during installation, to add an extra layer of insulation. I hadn’t done so, and in my initial tests, along with the bass issue, could tell that I would be well served with a little more “padding”.

This stuff is extremely easy to cut through, and even though I had to cut a few different slices to slide under the booth and have full coverage, it was worth it. I was also able to slide a few pieces between the booth and back wall, as there was just enough room for them. This made a big difference.
FINAL RESULTS & THOUGHTS
I’m writing this just a week after getting all of this done, so I may tweak my “final” thoughts, or add a comment or two down the line, as I settle into doing real work. Overall, I’m thrilled with my StudioBricks isolation booth. I have a professional space in which to work. In time, I’ll be using it for clients to use for recording. It looks sharp, too!
In a way, it’s actually not as private as the upstairs bedroom I’d been using before. I was made acutely aware of this when, one evening, I was recording and out of the corner of my eye suddenly saw my wife, who had crept up and was standing in front of the glass door. It scared the crap out of me and ruined a take, but was pretty funny. And the point is, she can be out there doing any number of things without trying to be quiet, and it won’t be loud enough to distract me.
As of this writing, I am still fiddling with my desk setup, and need to fine-tune my plugins, but the end result I’m getting early on is very acceptable.
StudioBricks actually builds and takes down your booth before they ship it to you. It’s a promise of quality, and to ensure all the pieces are there. That’s a great thing. But, going back to the lack of instructions or literature regarding your specific booth, I think it would be a big help if they could take pictures of the build process, put them on a thumb drive (or just e-mail them to you), and then you’d be able to see precisely where each piece goes.
I can’t say enough about StudioBricks’ customer service. Miguel was readily available whenever I needed him, even calling me that first evening to make sure I had my questions answered (it was 7pm EST). I appreciate that high level of care a lot, it makes a big difference in terms of having confidence with the product.
VIDEOS
Here are some videos of the build process and other aspects of the booth once it was done. It’s all one big video, but I’ve timestamped the following sections so you can easily watch whatever part interests you. If you have any questions, please send them to rick@barr26.com.
Full Video:
Initial Results:
Final Results: